Warmboard-S Install Guide

Assembly instructions for structural radiant panels

Warmboard-S Panel Description

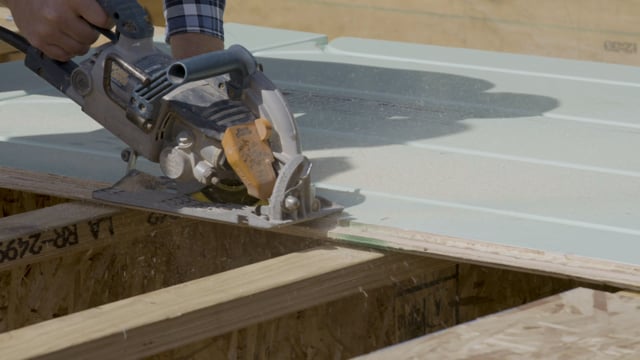
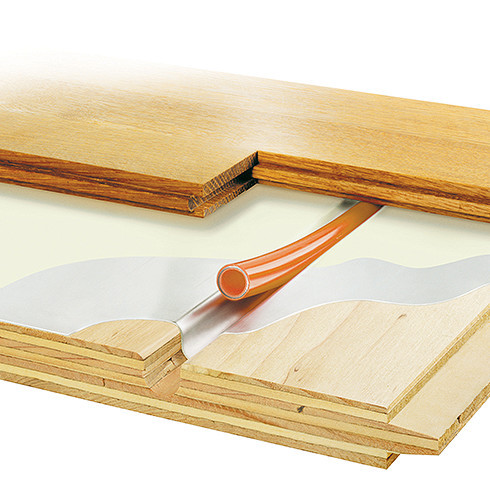
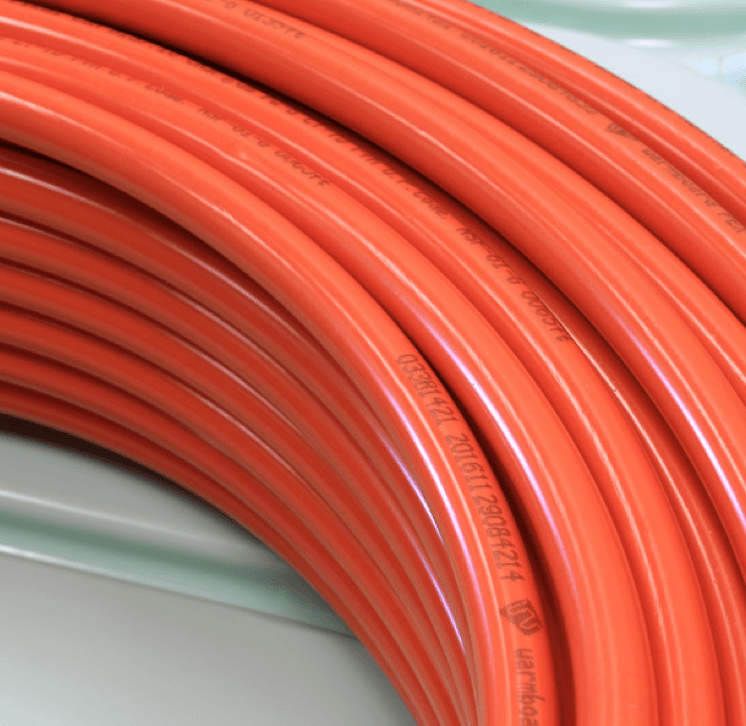
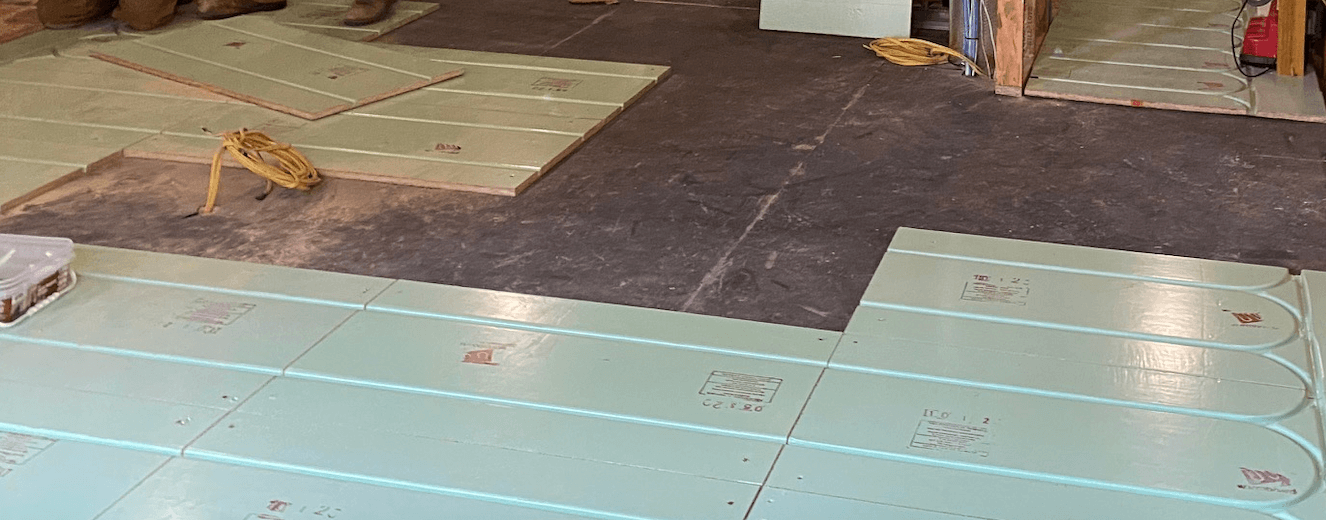
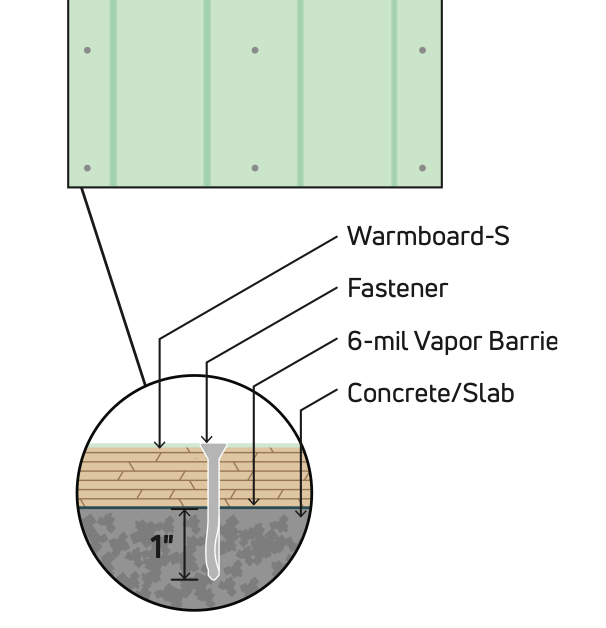
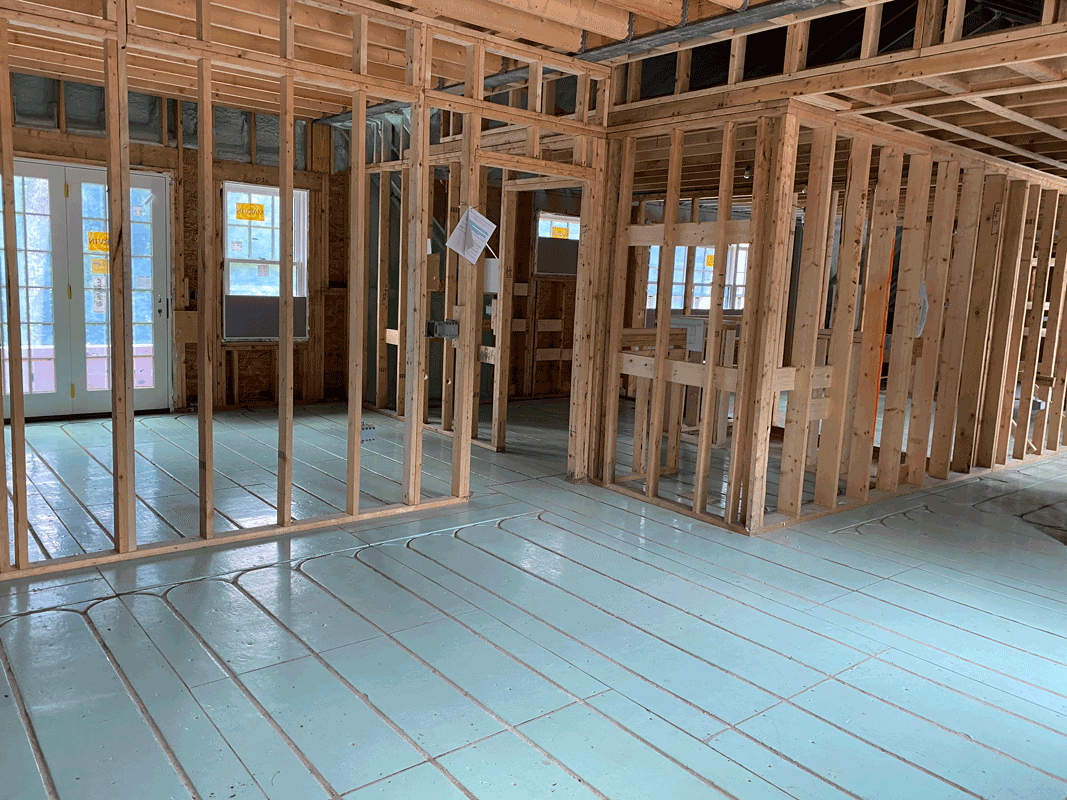
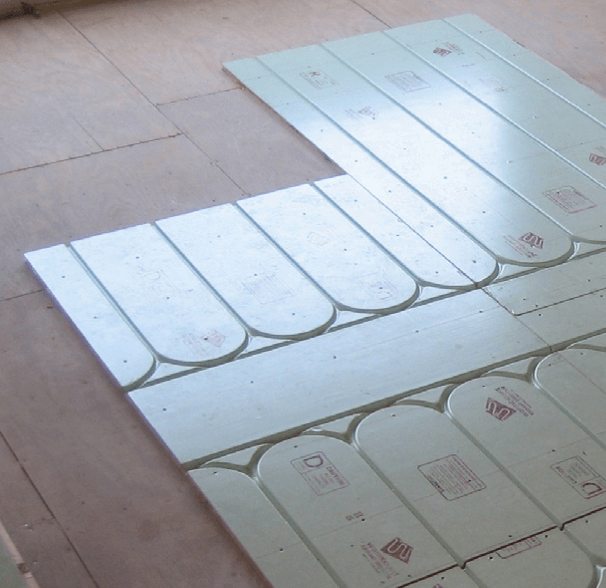
Warmboard-S is a structural, tongue and groove hydronic radiant subfloor panel made from 7-ply plywood with a conductive .025″ thick 1070 aluminum alloy skin bonded to the entire top surface. Each panel type is stamped with a series of aluminum channels on the top surface to accommodate the installation of 1/2″ PEX or PEX-AL-PEX tubing.

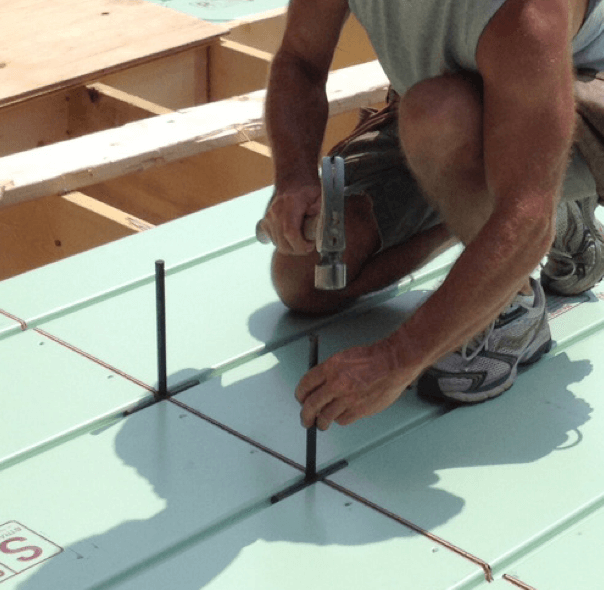
Warmboard-S consists of four, modular panel types, each measuring 4′ x 8′ x 1 1/8″ thick and weighing approximately 100 lbs. In a completed assembly, Warmboard-S weighs 3.2lbs per square foot, which includes the panel, tubing and water.

Warmboard-S is typically installed over joist (24″ OC maximum), though also over concrete or subfloor.

Non-aluminum filler panels are also available.

Wmb-S Panel types

warmboard-s panel types

APA Report: T2002Q-37
ICC Report: ESR-1421

  • Warmboard-S panels are but one component in a complete radiant system. System design should be done in accordance with manufacturers’ recommendations for ancillary components, and is the responsibility of the system designer.

Installation Highlights

  1. Count your panels when they arrive on site and confirm the shipment is correct. Use the color code painted on the end of each panel to compare numbers against your plan set, which will be found inside of your Installation Kit. If there are any questions or inconsistencies with your delivery, call us.
  2. Review the Shop Drawings: Check floor plan dimensions and joist layout. Verify that the joist direction and location of the pull are correct. Note that some tubing loops may need to be installed before the walls are framed, and some after.
  3. Gap 1/8″ between panels on the 4′ butt side (no need on the 8′ side). Use the alignment pins when fastening to ensure the tubing paths between panels line up.
  4. ONLY use tubing approved by Warmboard, Inc. DO NOT use silicone or other types of adhesives in the tubing channel.
  5. DO NOT exceed a 275 linear loop length when making field revisions.
  6. After tubing is installed, we recommend a Masonite or Lauan in high traffic areas to help protect the tubing. Remove before installing the finish floors.
  7. Custom routes require a router with a minimum 1.75 horsepower (2.25hp is recommended). DO NOT attempt a custom route without the proper wood and metal template guides.
  8. When installing over floor joists, it is mandatory that the crawl space or basement have substantial ventilation, per IBC guidelines to outside ambient air, Exposure to Weather. After installation, R-19 (or greater) insulation is required beneath the panels to prevent downward heat loss.
  9. Review this manual before installing finish floors.
  10. The surface temperature of finished floors is not to exceed 85ºF. This rule applies to the entire radiant industry.
  • By reading these highlights before proceeding, you will save you time, money and hassle.
  • Warmboard products are required to be installed and managed by experienced and licensed trade professionals pursuant to current local laws.
  • Failure to use proper installers will void any product warranty.
  • Should installed panels be exposed to rain, DO NOT install subfloor insulation until the panels have returned to an acceptable level of moisture content.


Warmboard-S: 7-ply plywood, tubing channel, aluminum, paint

Approved Tubing

PEX Aluminum PEX tubing, 1/2″ ID

  • Warmboard PEX: PEX-AL-PEX
  • Bluefin: PEX-AL-PEX
  • Mr. Pex: PEX-AL-PEX
  • Watts: PEX-AL-PEX


ONLY use the supplied Warmboard PEX-AL-PEX, which has been specified and tested by Warmboard for use with the WCS. 


PEX tubing, 1/2″ ID

pex tubing

  • HeatLink FL PEX-a
  • Mr. Pex
  • Rehau Raupex Oxygen Barrier
  • Uponor helioPEX X2
  • Uponor/Wirsbo hePEX
  • ViegaPEX Barrier
Warmboard Comfort System tubing

Although Warmboard approves these tubing products for panel projects, they are NOT supported for use with the WCS. ONLY use the supplied Warmboard PEX-AL-PEX.

Necessary Tools

Tools and Materials

  • Circular saw, carbide blade
  • Router, minimum 1.75 horsepower, 25hp recommended
  • Electrician nailing plates
  • 16oz Rubber mallet
  • Warmboard approved tubing
  • Shop vacuum
  • Drill motor with a 3/4″ drill bit
  • PEX tubing cutter
  • Wax pencil or permanent marker
  • Tubing un-coiler
  • 4″ Grinder or Dremel tool

Warmboard Installation Kit Content

(supplied with each order)

  • Warmboard panel/tubing plans
  • 3 Custom routing templates (wood)
  • 5/8″ Router bit
  • 2 Alignment pins
  • Router template guide
  • Router guide lock nut

Installing over Joist

Preparation for over joist install

For traditional joist application, fasten with panel adhesive and 23/4″ screws or ring shank nails as specified by your design professional or listed in our ICC-ES report. Apply common sense when sizing fasteners for Truss and I-Joist systems, and select a fastener to grab as much flange as possible. DO NOT size a nail or screw that will penetrate the bottom side of the flange.

If the nailing pattern is not listed in the architectural specification, the APA (American Panel Association) recommends a 12″ inside, 6″ edges pattern.

As panels are placed, tap alignment pins into place on the two outer most channels, across the seam between the adjacent panels, to ensure proper channel alignment. Pay close attention to the Panel Layout plans as the work proceeds. Per APA guidelines all subfloor panels should be gapped 1/8″ on the 4′ side.

Exposure to weather

Warmboard-S panels are rated “Exposure 1” by the APA. They can be exposed to occasional and intermittent rain, snow and ice for a building season and still serve as structural subfloor. Warmboard-S panels will still respond to moisture like any plywood product, which means minor edge swelling can occur from water intrusion.

If the panels experience water intrusion, create a constantly dry and well-ventilated environment beneath to release this moisture from the bottom side of the panels. This is necessary due to the aluminum bonded to the top of the plywood.

  • It is ESSENTIAL to check your plan set (inside the  installation kit) to see where the first panel is to be installed.
  • Warmboard-S panels install over joist just like regular subfloor.
  • Cut panels with the aluminum side down and save your offcuts as they may be used elsewhere in the project.

Over Joist Install Tips

DO NOT insulate below the panels until the structure is completely dried-in and all excessive moisture has been released from the panels.

Here are a few installation tips that are crucial to understand and follow.

  • Keep the panels completely dry and covered until the time of installation
  • If installing over a crawl space or basement, this space MUST be well-ventilated (per IBC guidelines) and completely dry at all times during the construction process
  • If installing over slab, ensure the slab is completely cured and dried, then apply a moisture barrier. Warmboard-S panels MUST be completely dry before, during and after installation
  • To accelerate the removal of moisture, fire up the boiler and circulate hot water through the system. Using portable fans and/or heaters is also effective
  • If edge swelling occurs, the panels will return close to their original shape once the moisture exits the panels
  • If the panels are exposed to rain or snow, create a constantly dry and well-ventilated environment so the moisture can be released from the bottom of the panel.

Installing over Slab

Benefits of installing over Concrete slab

Installing Warmboard-S over a concrete slab can retrofit a basement, home remodel or new home with a state of the art radiant floor heating system. A broad range of finish floor options are available, including hardwood, tile, carpet, vinyl and linoleum.

Concrete Slab Requirements

The existing slab MUST be level and flat. A newly poured slab needs to be well-cured for a minimum of 30 days, and a moisture test should be conducted to ensure the slab is properly cured prior to installation of Warmboard-S.

Like any wood product, if Warmboard-S panels are exposed to standing water or moisture intrusion, the wood will swell and rot. DO NOT use Warmboard-S if these environmental conditions are possible during or after construction.

Testing for Moisture

There are several methods by which to test the moisture content of a newly poured slab, the simplest being the “Plastic Sheet Method” (ASTM D 4263-83).

To do this, place an 18″ x 18″ clear plastic sheet on the slab and tape down on all sides. DO NOT allow the sheet to come in contact with direct sunlight or excessive heat. After 16 hours, if any condensation is found on the underside of the plastic, or if the slab surface is darkened, the concrete is too wet for a coating application.

NOTE: It is possible for this method to yield a false result in cooler conditions when the concrete may retain moisture and fail to condense on the plastic.

To ensure a reliable result, make sure that the surface temperatures and ambient conditions during the test are very similar to those present after the Warmboard panels are installed.

If not performing a moisture test, we recommend giving a newly poured slab 90 days to cure fully. Once certain of the moisture level of the slab, we recommend one of two installation methods.

  • The slab MUST have sufficient drainage from rain and snow at all times. Failure to provide sufficient drainage will void any product warranty.
  • Warmboard-S MUST be mechanically fastened, not just floated or glued. Failure to mechanically fasten the product will void any product warranty.

warmboard-s over slab diagram

Method 1: Fasten Directly

Apply either a liquid vapor barrier or a 6- or 10-mil polyethylene vapor retarder overlapping two feet (2′) at the seams. Continue with Warmboard-S panel installation using split drive anchors, Tapcon concrete fasteners or powder-actuated fasteners. We recommend a maximum of 21 fasteners for each panel.

Method 2: Using Insulation

Install a 6- or 10-mil polyethylene vapor retarder directly to the slab, overlapping two feet (2′) at the seams. Next, install a 1/2″ Homasote Comfort Base or Homasote 440 SoundBarrier over the entire slab (adding a R-value of 1.2). Gap all Homasote panels 3/16″ from all adjoining panels and 3/8″ from walls. Use fasteners (21 per panel) to attach the entire assembly to the slab. Find the instructions for these products at homasote.com.

Method 3: Sleepers

Install a 6- or 10-mil polyethylene vapor retarder directly to the slab, overlapping two feet (2′) at the seams. Continue by installing 2″ x 4″ pressure treated sleepers attached to the slab (flat framed) on 24″ centers with fasteners. Insulate the cavity between the sleepers with  rigid foam insulation.

To complete the procedure, install Warmboard-S and fasten to the sleepers with screws or ring shank nails and construction adhesive.

  • The slab MUST have sufficient drainage from rain and snow at all times. Failure to provide sufficient drainage will void any product warranty.
  • Warmboard-S MUST be mechanically fastened, not just floated or glued. Failure to mechanically fasten the product will void any product warranty.

Fastening to Concrete

Drilling should be done with the Warmboard panels in place (pre-drilling the concrete is not recommended). Use a heavy duty roto hammer drill and a high-quality 1/4″ masonry drill bit. The hole should be 1/2″ deeper than the required specification. Once drilled, draw the drill bit in and out a few times to loosen excess material. Use a shop vacuum to remove the debris.

Choose one of the following methods to fasten the Warmboard panels to the concrete. Use a pattern of 3 rows of 7.

  • Flat head Split Drive Anchors will save you many hours of labor, but may be difficult to find in retail locations. Call 888.498.5747 or visit confast.com.
  • Fasteners MUST exceed a length of 2 1/4″ if using Homasote between the slab and Warmboard-R.

Installing over Subfloor

Preparation for Subfloor installation

It is essential that the existing subfloor is both flat and smooth before the installation of Warmboard. Inspect the subfloor for evenness along the joists and flatness between the joists.

If necessary, sand the subfloor and install extra blocking below. Inspect for squeaks and refasten with decking screws as necessary.

Cutting and installing Warmboard-S is very straightforward. The panels can be trimmed with a standard skill or table saw and will rip just like ordinary subfloor. We recommend cutting with the aluminum side down to help avoid burrs. If you need to cut the panels, the aluminum side must be down.


Method 1: Screw Only

Use a #8 x 2″ GRK R4 Multi-Purpose screw (or equivalent) with a top 1/2″ smooth shank.

  • Fasten with a grid pattern of 6″ on the edges and 12″ on the inside
  • No pre-drilling required
  • Self-counter sinking
  • No adhesive needed

Method 2: Nail and Glue

Use a construction adhesive designed for bonding to plywood (Loctite PL Wood Adhesive or equivalent).

Follow all directions specified by the manufacturer. For nailing, use a ring shank or a screw nail. To determine the length of the nail, evaluate the thickness of the existing subfloor and add 11/8″.

  • It is crucial to use the alignment pins to line up the channels from panel to panel.
  • The subfloor and Warmboard-S MUST be completely dry, with a moisture reading between 8-12% before, during and after installation.