Installing Tile or Stone Flooring

This step of the radiant heat panel install goes after the preparation and installation of the panels. We recommend to review the complete install guide and our supplied plan set before work begins.

Tile or Stone flooring

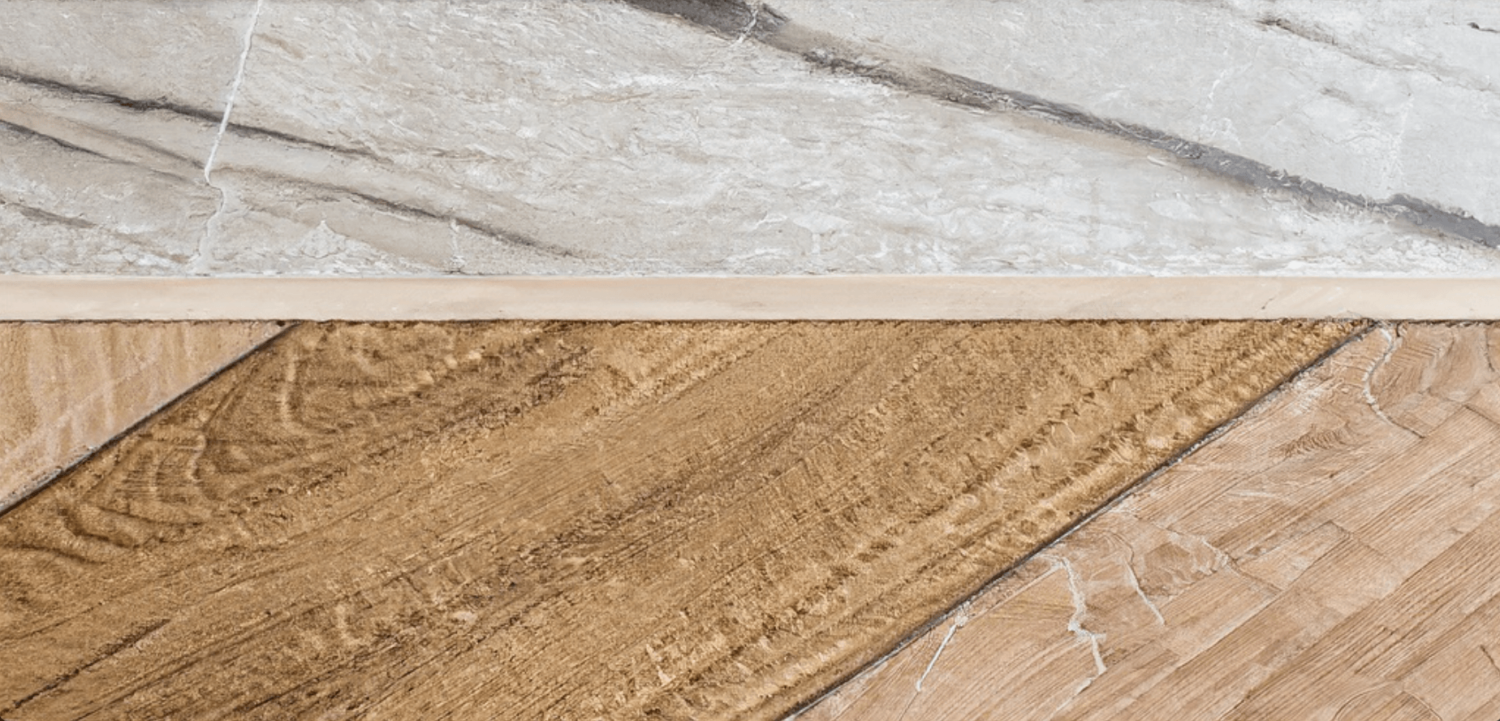
Tile or stone set to Warmboard panels is subject to all of the tile setting requirements of any ordinary unheated wooden subfloor.

Testing and Approvals

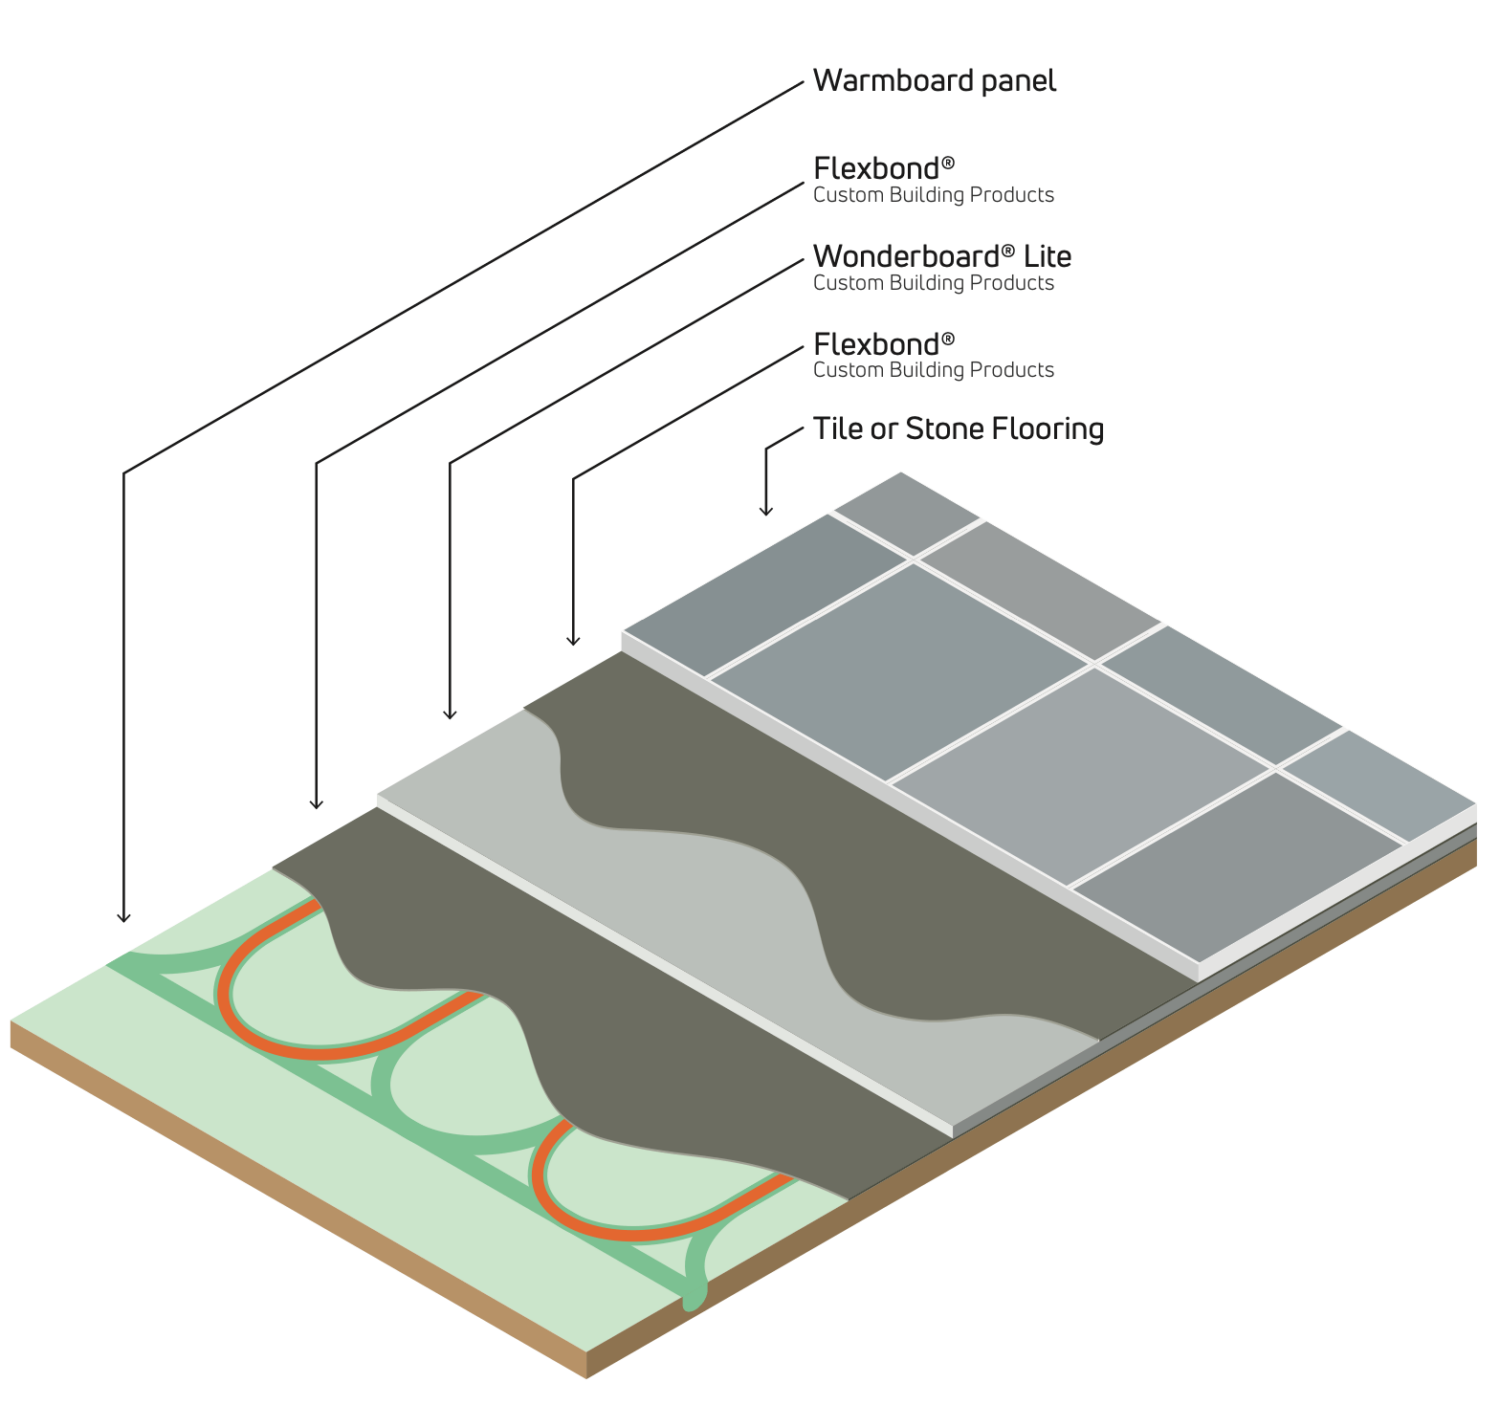
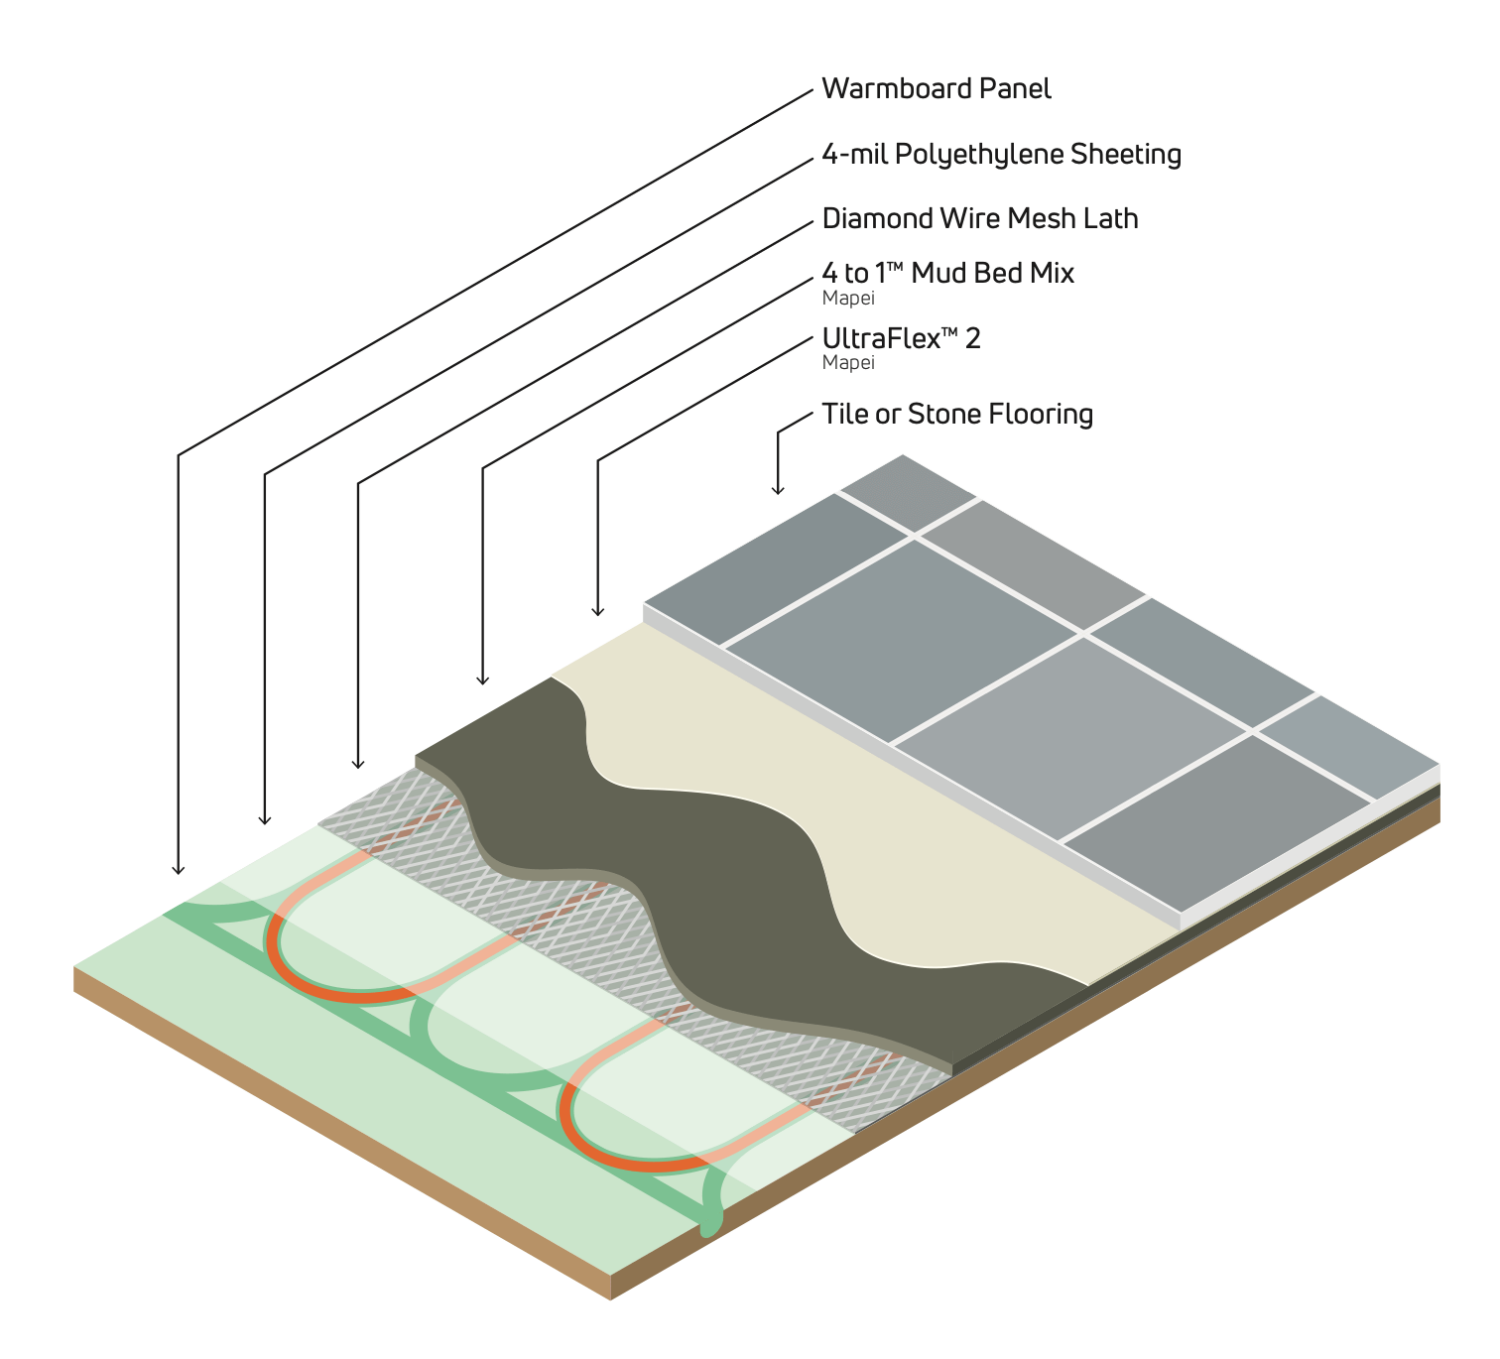
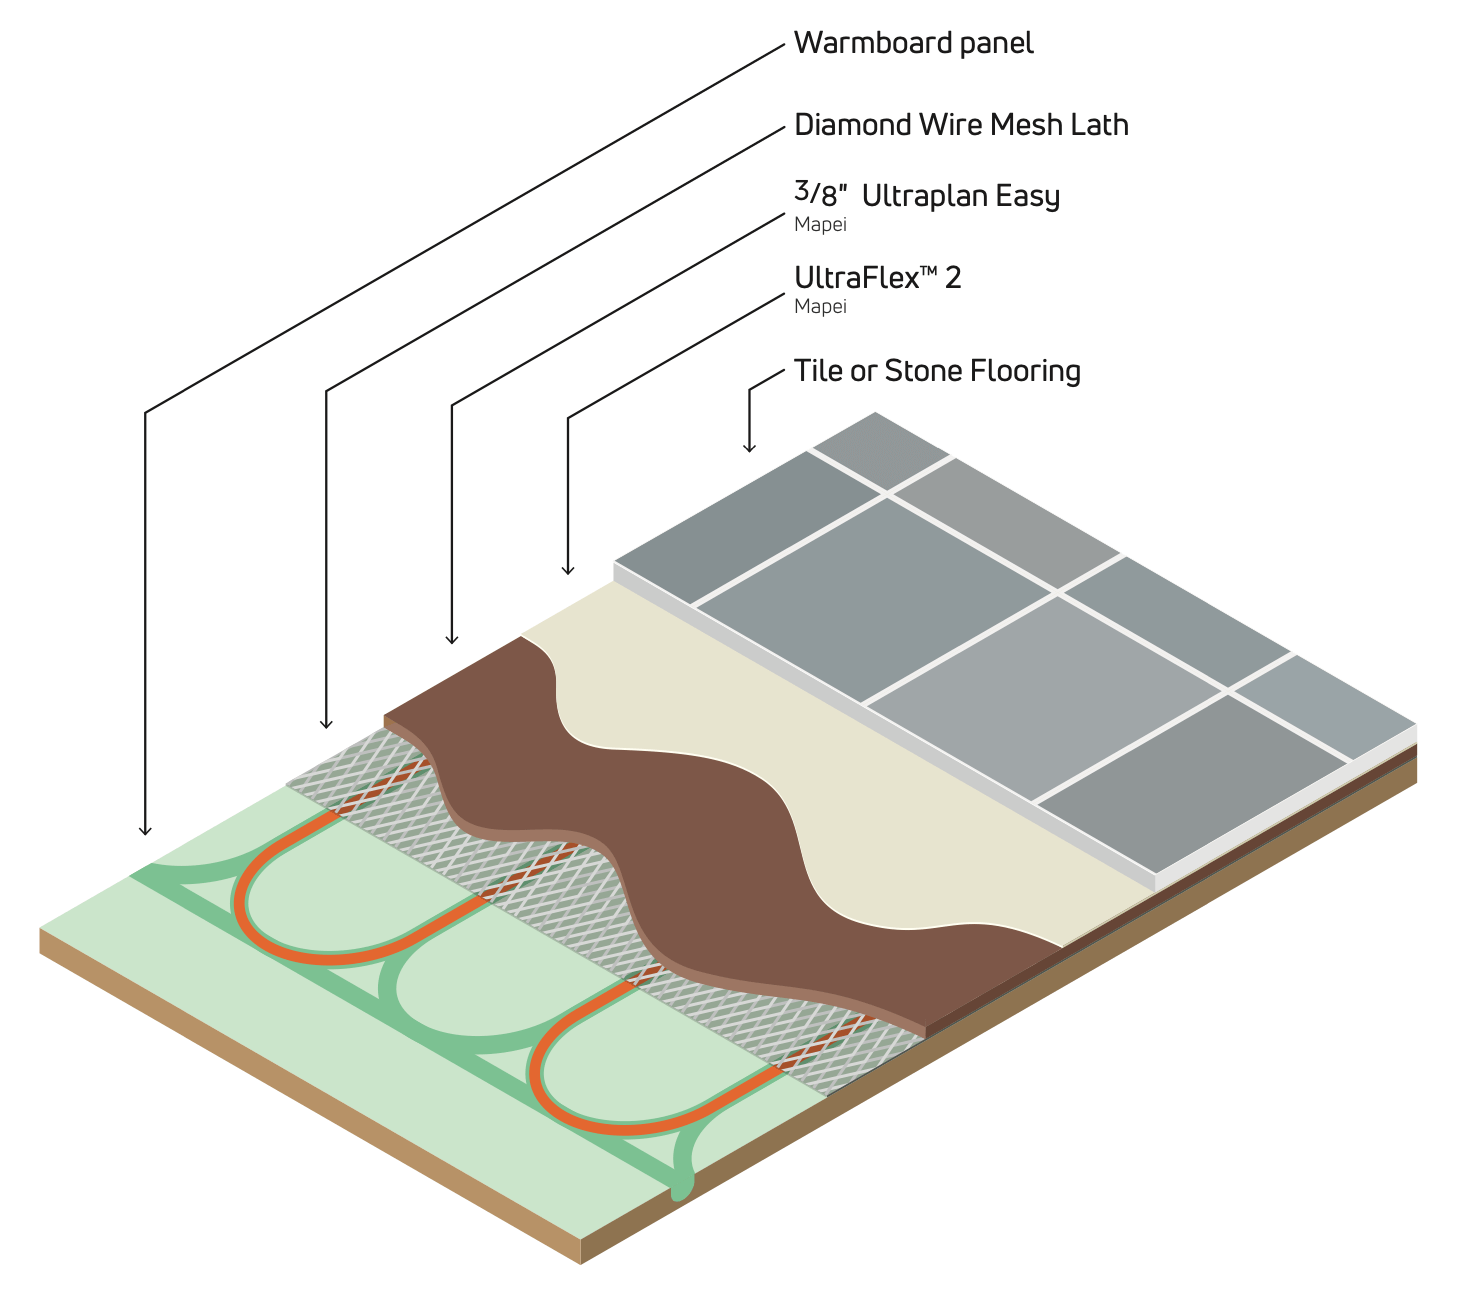
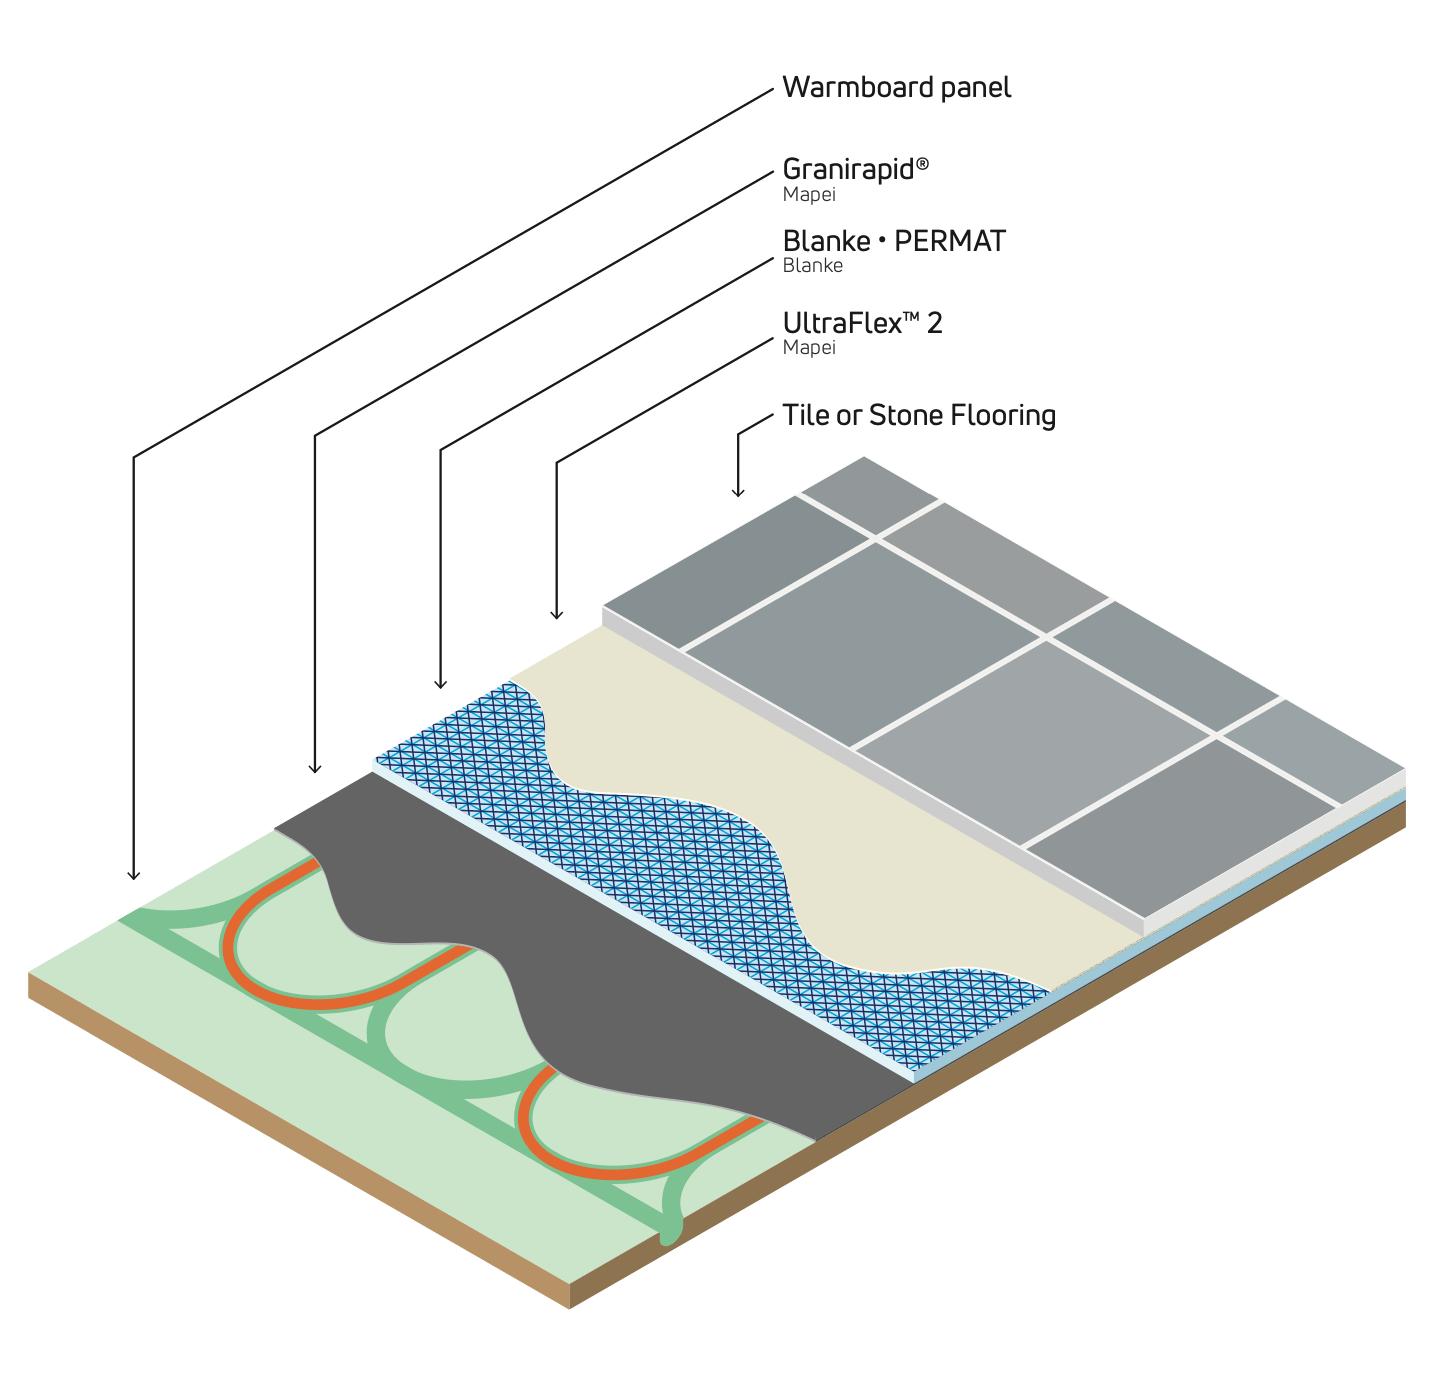
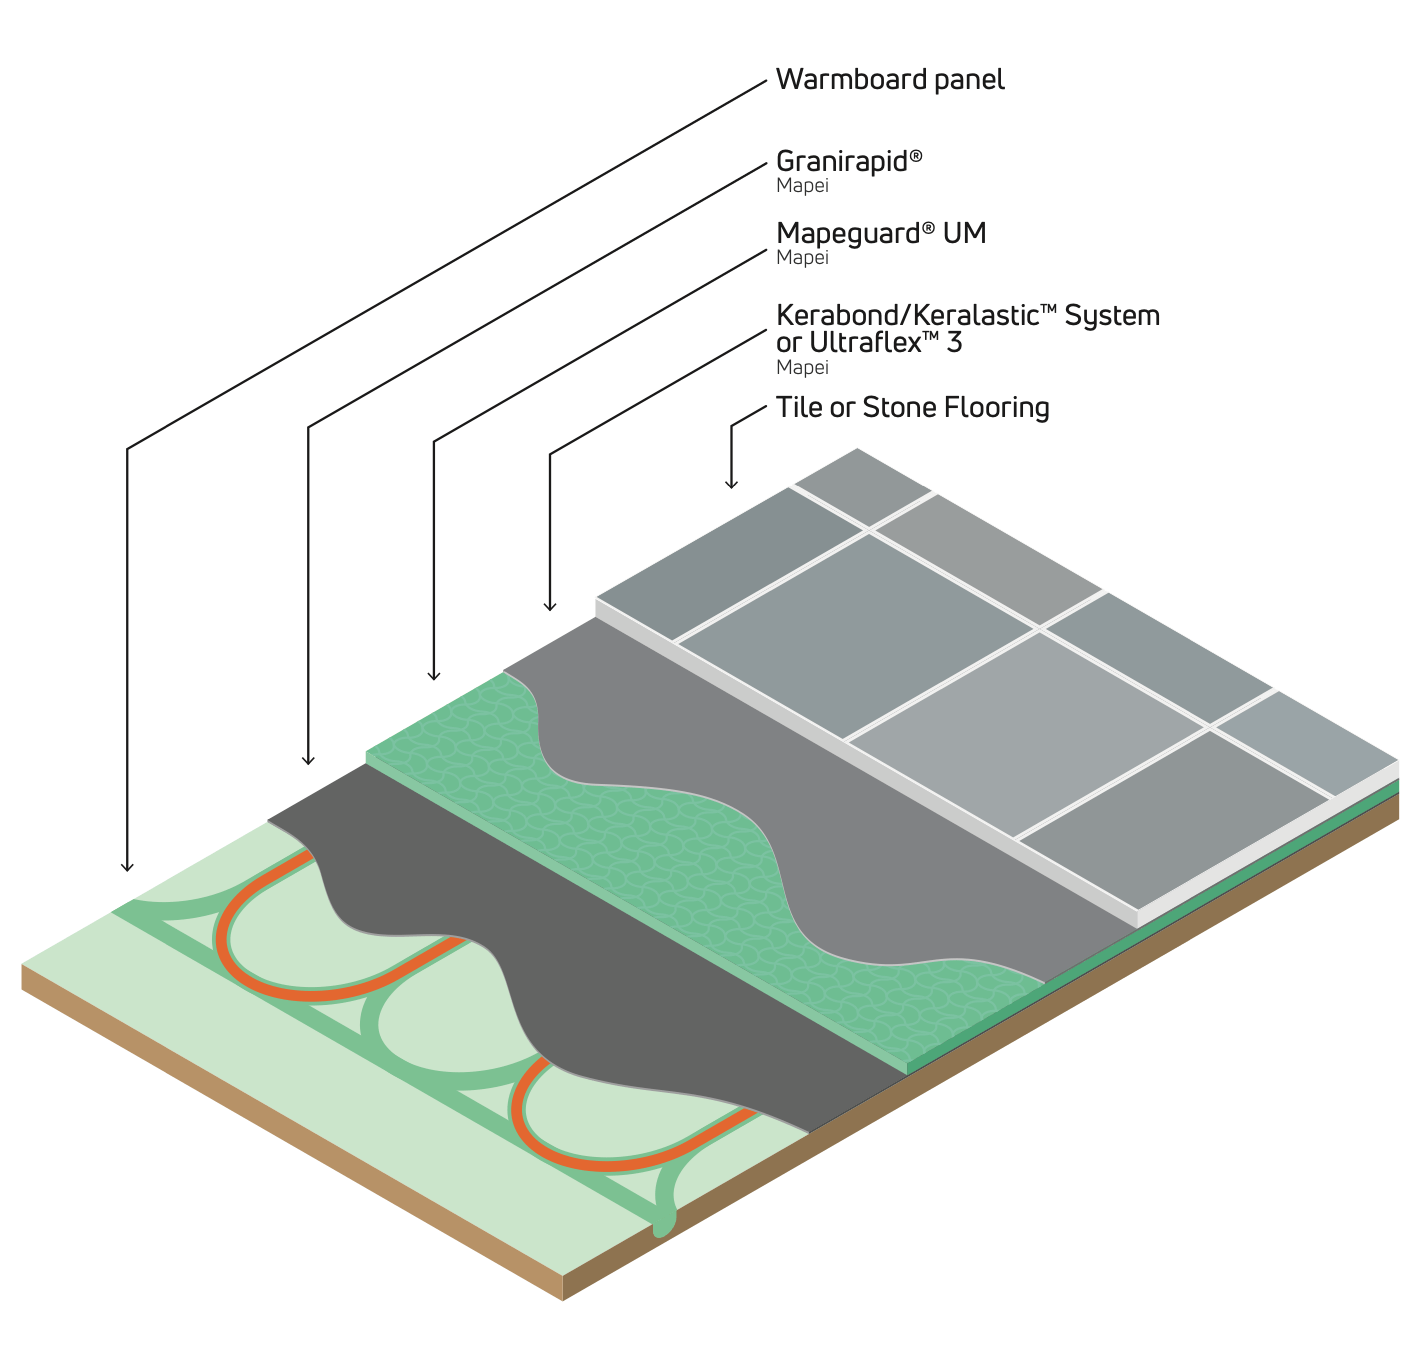
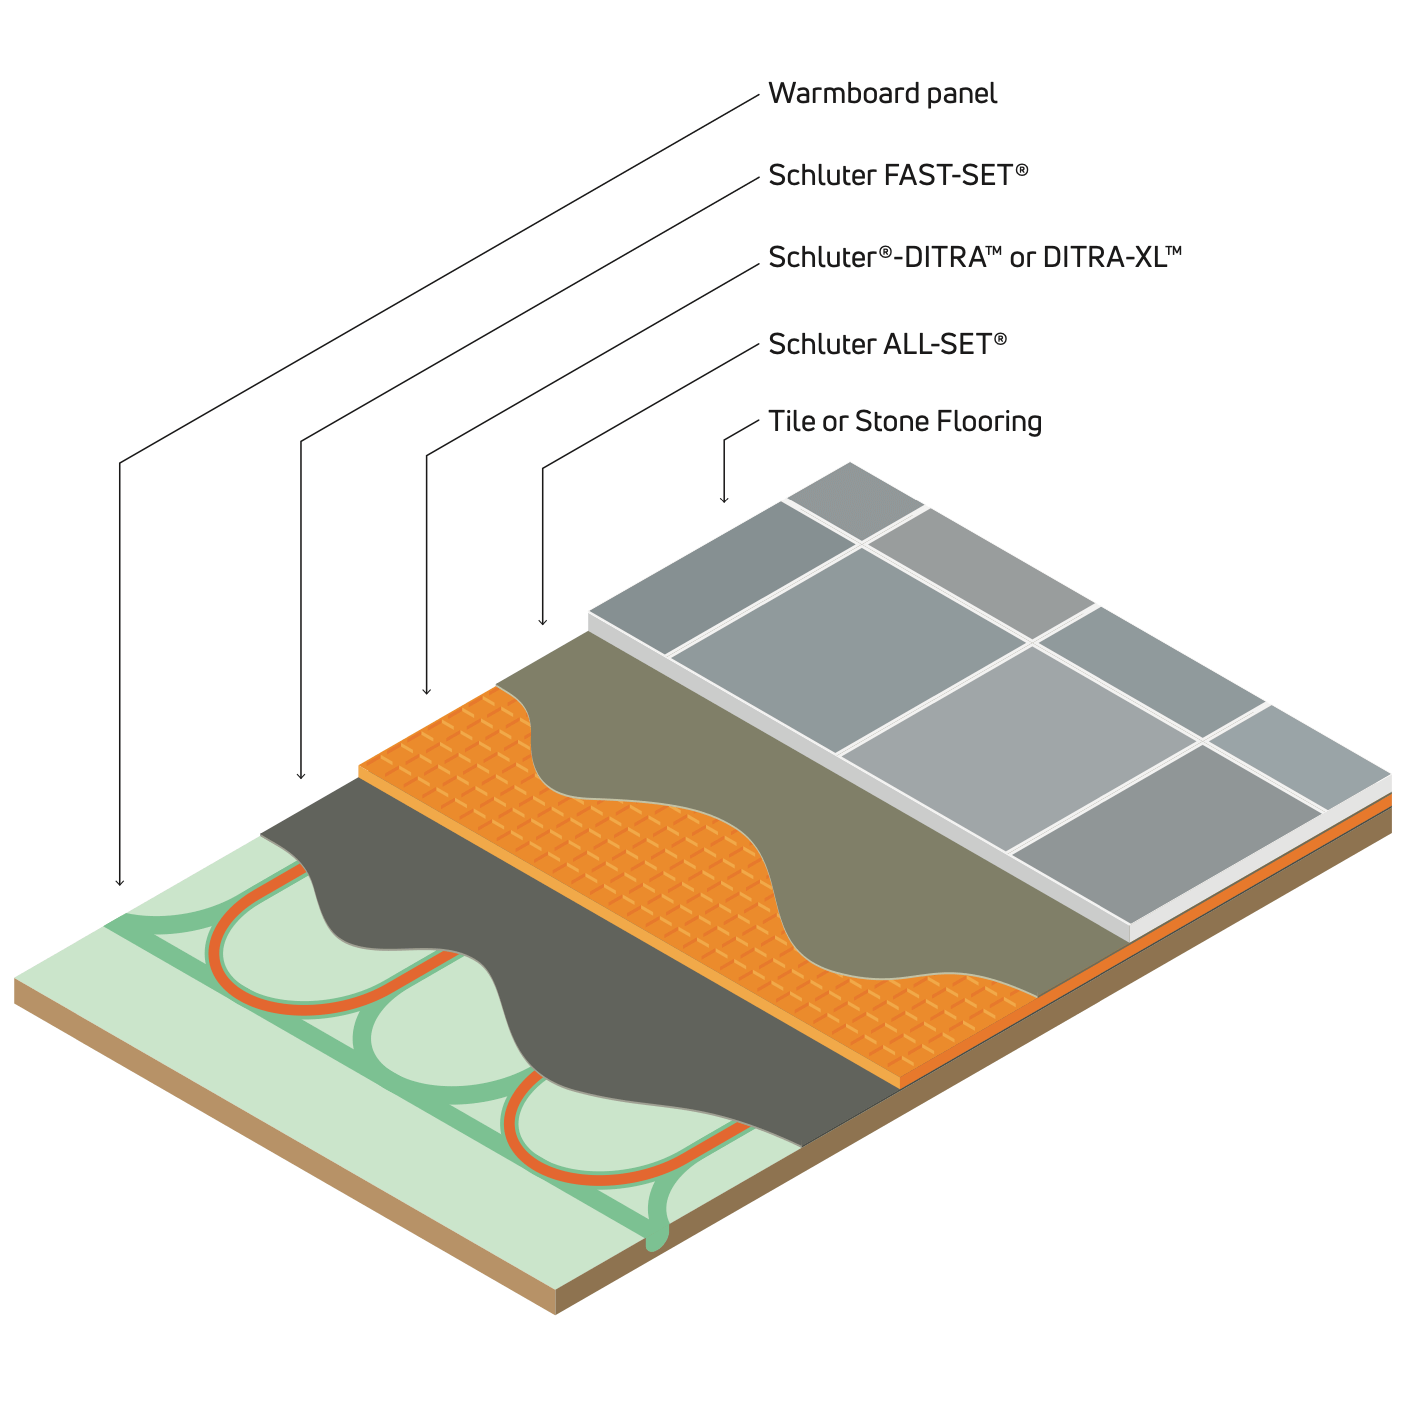
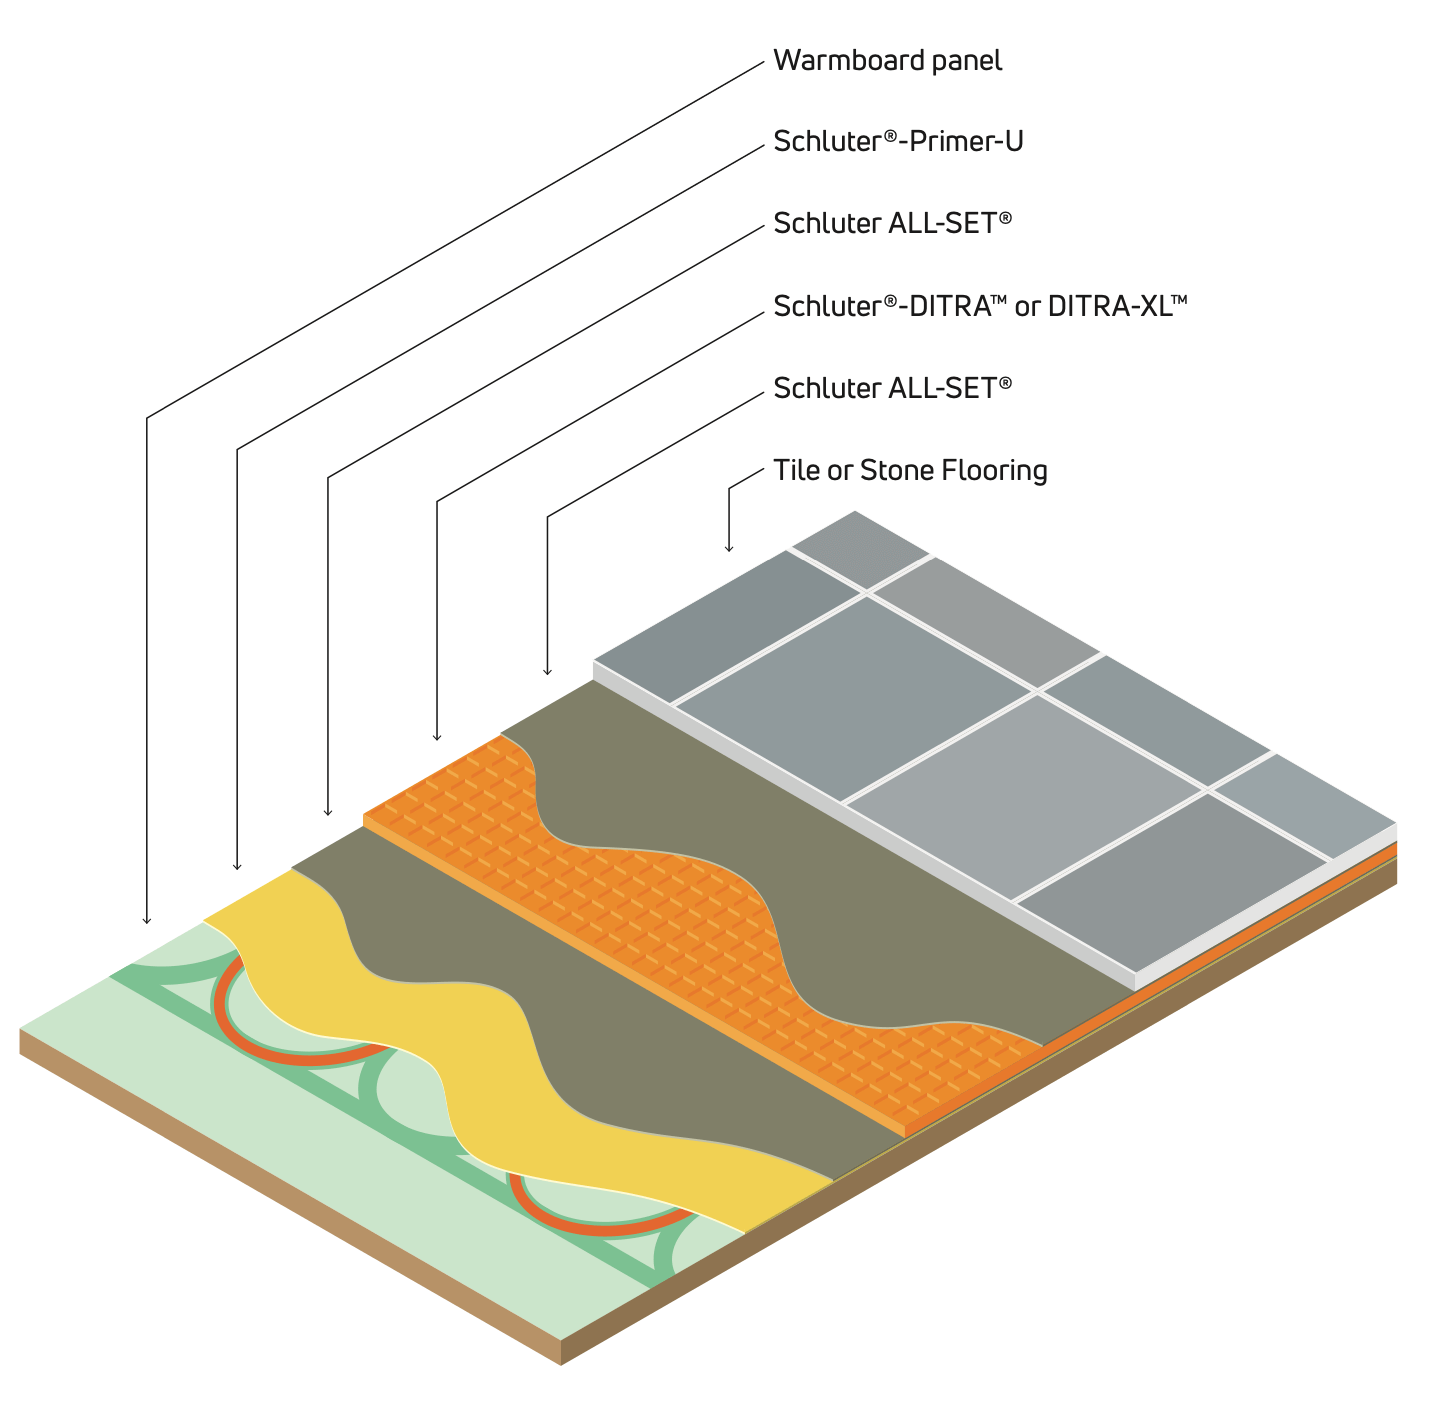
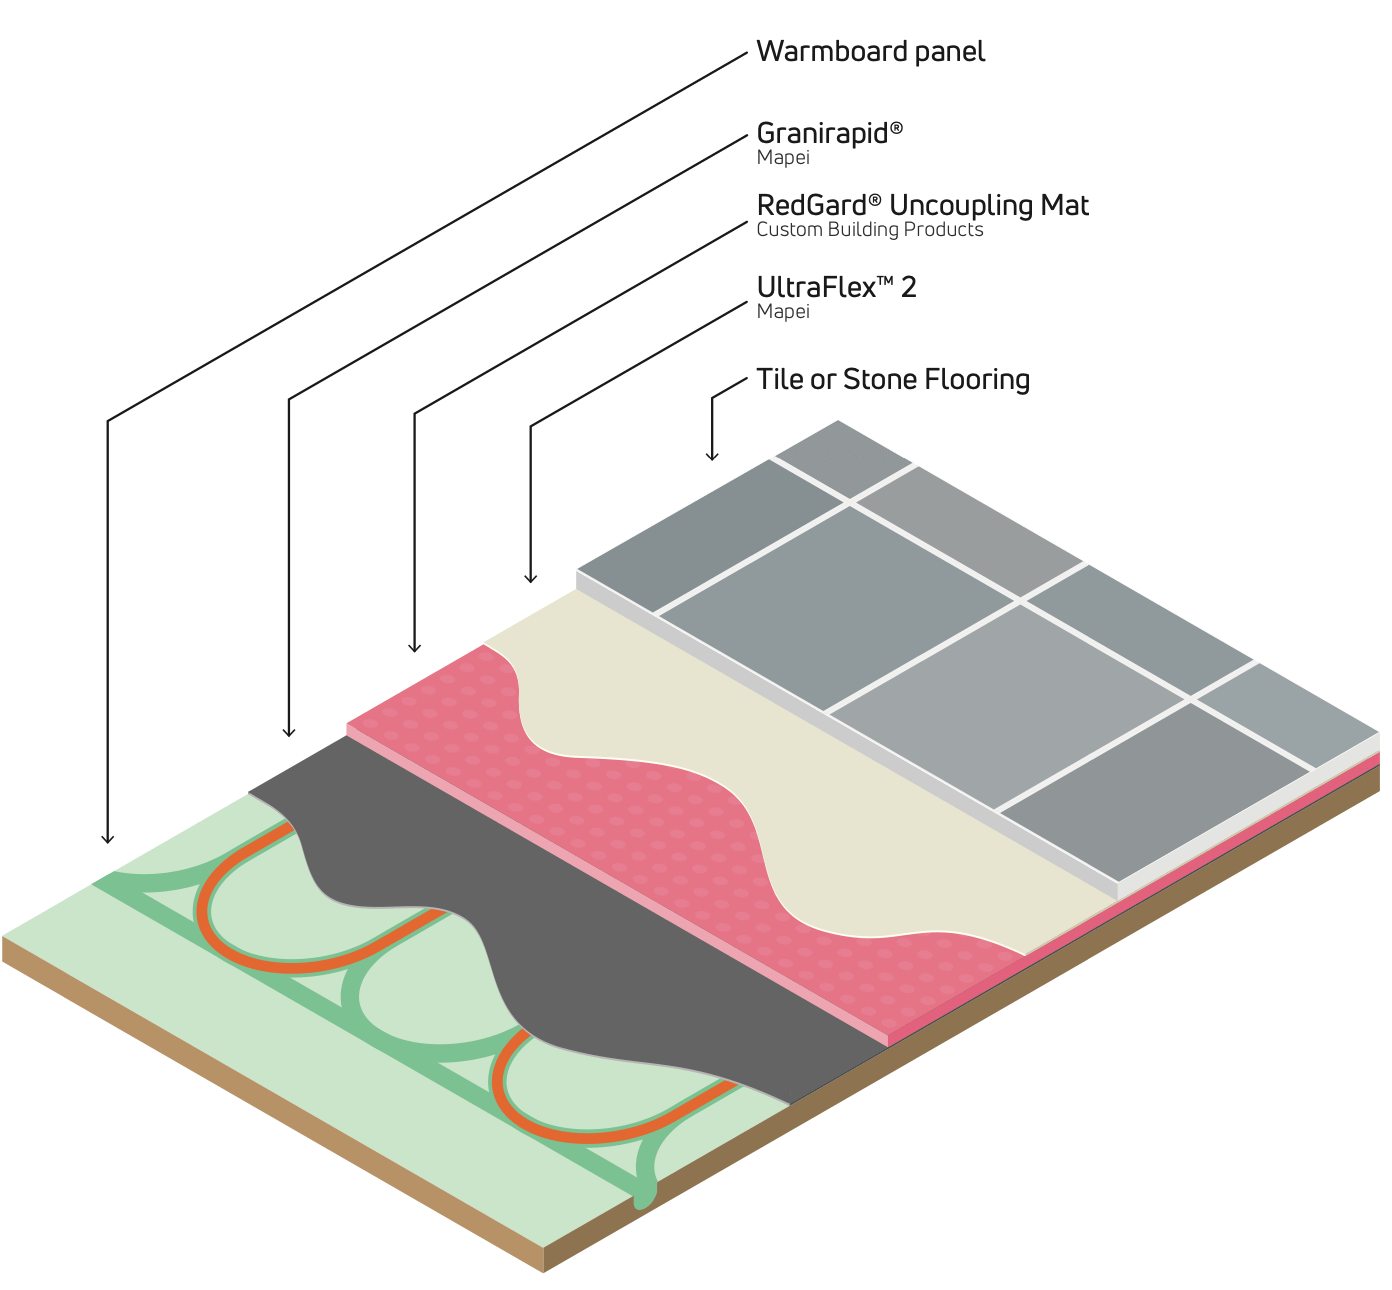
We recommend using one of seven tile assemblies when installing tile or stone over Warmboard. Three of these methods have been warrantied and approved by product manufacturers, and five have been rigorously tested by the Tile Council of America (TCNA). These tests provide an expert third party endorsement for best practices when installing tile and stone over Warmboard radiant panels.

Robinson Floor Test (ASTM C627) results are available upon request.

NOTE: Warmboard-R has not been tested by the TCNA. However, due to the near identical properties of the panel, we are convinced that Warmboard-R would perform equally under the testing conditions. Our experience in the field supports this. 

TCNA Ratings & Description

  • TCNA rating: Residential (homes)
    Tile survived 3 cycles of testing with no damage

  • TCNA rating: Light Commercial (offices, etc.)
    Tile survived 6 cycles of testing with no damage

  • TCNA rating: Moderate (hospitals, etc.)
    Tile survived 10 cycles of testing with no damage

  • TCNA rating: Heavy (shopping malls, etc.)
    Tile survived 12 cycles of testing with no damage

  • TCNA rating: Extra Heavy (airports, etc.)
    Tile survived 14 cycles of testing with no damage
  • Ensure your chosen products and methods meet  the standards set by the TCNA, ANSI and ICC. Follow the manufacturer’s recommendations when using their products.
  • Warmboard Inc. is not an agent for manufacturers listed herein, and gives no implied warranty for any of these products or manufacturers on these assemblies.

Recommended Assemblies


Backer Board

Backer boards have a low mass and are relatively inexpensive to install. They can be 1/4″ or 1/2″ thick and provide a base for tiled areas which will match up well with adjacent finish flooring. There are a variety of Cementitious Backer Units (CBUs) available.

  • Apply thinset to the surface of Warmboard using a square-notched trowel (this layer will function as a butter coating)
  • Immediately, before the thinset dries, fasten the Backer board using Backer board screws
  • Use Backer board tape on all seams then apply the thinset
  • Finish with tile or stone

A warranty letter from Custom Building Products for this application is available upon request.

backer board

Backer board MUST run perpendicular to the Warmboard panels. Be sure to stagger the seams and take special care when fastening to avoid tubing damage.

  • Surface temperatures of the finish flooring should not exceed 85˚F.
  • This specific assembly was TCNA tested.
  • Substituting comparable brands is acceptable

Backer Board Stencil

Using a clear polyethylene sheet (3- or 4-mil), take a permanent marker to quickly create a stencil of the tubing pattern. Now, use this stencil as a guide over the Backer board to install the fasteners and avoid tubing damage.

  • Cut the polyethylene to the size of Backer board (cut all 3′ x 5′ stencils at once to save time).
  • DO NOT cut directly over the Warmboard or the tubing
  • Place the cut sheets over the Warmboard panel and tape down the corners. With a permanent marker, clearly mark the top and bottom of the stencil, then trace the tubing pattern.
  • Remove the stencil and lay flat next to your work areas
  • Trowel a coat of Thin-set over the Warmboard panel and set the Backer board
  • Align the stencil and tape down over the Backer board. Pre-drill all safe fastening locations, then remove stencil and fasten as normal

backer board stencil

Take care to avoid tubing damage.

Mud Bed, MAPEI

A mortar bed is the traditional method of addressing the expansion, contraction and deflection properties of wooden subfloors while providing a thick, continuous and stable surface for tile adhesion.

However, they are expensive and add significant mass to a system. The thickness often causes the elevation of tile areas to misalign with adjacent carpeted or hardwood areas.

  • Install a layer of 4- or 6-mil polyethylene to serve as a cleavage membrane
  • Fasten down a diamond wire mesh lath over the membrane using crown staples
  • Finish with a minimum 3/4″ mortar bed (Mapei® 4-to-1 Mud Bed Mix or equal).
  • After the mortar bed has cured, apply thinset
  • Finish with tile or stone

mud bed mapei

A warranty letter from Mapei for this application is available upon request.

TCNA testing results are available upon request.

  • This specific assembly was TCNA tested.
  • Substituting comparable brands is acceptable.

Self-Leveling Underlayment, Mapei

This product has a thin profile with the great strength of a mortar bed.

  • Clean the panels and apply “Mapei Primer T” (per Mapei instructions)
  • Follow with the diamond wire mesh lath and attach with crown staples
  • Mix and apply “Ultraplan® Easy” at a thickness of 3/8″ or more
  • Apply thinset
  • Finish with tile or stone

self-leveling-underlayment

A warranty letter from Mapei for this application is available upon request.

TCNA testing results are available upon request.

  • Surface temperatures of the finish flooring should not exceed 85˚F.
  • This assembly was TCNA tested. Substituting comparable brands is NOT recommended.

Uncoupling Membrane, Blanke

Blanke PERMAT offers amazing crack isolation protection with superior compression and tensile strength. The Blanke PERMAT reinforced mesh panel adds major support to wood subfloors, greatly reducing vertical subfloor movement (deflection).

  • Clean the panels
  • Trowel on the Mapei Granirapid thinset mortar using a V-notched trowel
  • Immediately install the Permat
  • The next day, follow with thinset using a square-notched trowel
  • Finish with tile or stone

uncoupling membrane, Blanke

A warranty letter from Mapei for this application is available upon request.

TCNA testing results are available upon request.

  • Surface temperatures of the finish flooring should not exceed 85˚F.
  • This assembly was TCNA tested. Substituting comparable brands is NOT recommended.

Uncoupling Membrane, Mapei

Mapeguard UM is a premium-performance, lightweight, waterproofing and vapor-pressure equalizing membrane that provides crack suppression for ceramic tile and stone installations.

  • Apply the Mapei Granirapid® thinset mortar using a v-notched trowel
  • Install the Mapeguard UM
  • Wait for the mortar below the Mapeguard UM to be completely dry
  • Trowel on the Kerabond/Keralastic System (or Ultraflex 3)
  • Immediately finish with tile or stone

uncoupling membrane-Mapei

TCNA testing results are available upon request.

  • Surface temperatures of the finish flooring should not exceed 85˚F.
  • This assembly was TCNA tested. Substituting comparable brands is NOT recommended.

Uncoupling Membrane, Schluter

Schluter®-DITRA® and DITRA-XL™ uncoupling membranes are designed to help prevent cracking in ceramic and stone tile installations. Made of waterproof polyethylene, these product installations can be waterproofed with minimal effort.

  • ROll a layer of Schluter® PRIMER-U directly over the Warmboard and PEX tubing
  • Apply a layer of Schluter® ALl-SET®. Before the thinset is cured, install the uncoupling membrane
  • Once the Schulter® ALL-SET® is completely dry, trowel Schluter® ALL-SET® modified thinset mortar directly on top of the uncoupling membrane
  • Finish with stone or tile before the Schluter® ALL-SET® has cured

uncoupling membrane schluter

Follow all Schluter installation instructions for these products.

An approval letter from Schluter is available upon request.

  • As an alternative approved method, Schluter FAST-SET® can be used both above and below the uncoupling membrane.
  • For stone applications over DITRA, structural joist (TJI) MUST be on 16″ centers.
  • Surface temperatures of the finish flooring should not exceed 85˚F.
  • Substituting brands is NOT recommended.

Uncoupling Membrane 2, Schluter

Schluter®-DITRA® and DITRA-XL™ uncoupling membranes are designed to help prevent cracking in ceramic and stone tile installations. Made of waterproof polyethylene, these product installations can be waterproofed with minimal effort. 

  • Roll a layer of Schluter® PRIMER-U directly over the Warmboard and PEX tubing
  • Apply a layer of Schluter® ALl-SET®. Before the thinset is cured, install the uncoupling membrane
  • Once the Schulter® ALL-SET® is completely dry, trowel Schluter® ALL-SET® modified thinset mortar directly on top of the uncoupling membrane
  • Finish with stone or tile before the Schluter® ALL-SET® has cured

uncoupling membrane schluter 2

Follow all Schluter installation instructions for these products.

An approval letter from Schluter is available upon request.

  • For stone applications over DITRA, structural joist (TJI) MUST be on 16″ centers.
  • Surface temperatures of the finish flooring should not exceed 85˚F.
  • Substituting brands is NOT recommended.

Uncoupling Membrane, RedGard

The RedGard® Uncoupling Mat is a water and vapor-proof uncoupling membrane that can be used for crack-isolation in most tile, porcelain or natural stone installations. This product absorbs stress and preserves the surface and integrity of the tile. RedGard Uncoupling Mat’s bonding layers have reinforced fleece which locks mortar into the mat,ensuring strong, reliable installations.

  • Clean the panels
  • Apply the Mapei Granirapid® thinset mortar using a v-notched trowel.
  • Immediately install the RedGard Uncoupling Mat
  • The next day, follow with thinset using a square- notched trowel
  • Finish with tile or stone.

uncoupling membrane redgard

An approval letter from Custom Building Products is available upon request.

  • Surface temperatures of the finish flooring should not exceed 85˚F.
  • Substituting brands is NOT recommended.